![]()
|
GL1200 Fuel Cell The following is a description of how I added a fuel cell to my 1984 Honda Gold Wing. I am not a professional mechanic. This is not meant as a guide. It is meant for entertainment purposes only. I take no responsibility for anyone who attempts to follow these instructions and install their own fuel cell. You may damage your bike, stink of gasoline, crash-and-burn, or EXPLODE!
Background: When reading about people doing long distance riding and adding extra fuel capacity to their bikes, I got interested in how to do it. After doing my Bun Burner 1500 Gold I learned that the desolation of some state highways late at night can be murder on your nerves if you only have a reliable range of 150 miles. Thanks to tips and bits of info from various LDRiders, I was able to cobble together a way to install a fuel cell on my bike. None of the installation makes any permanent changes to the bike. It can all be removed and the bike returned to stock within about an hour.
Application: The 1984 Aspencade uses carburation instead of fuel injection. If you have fuel injection, this type of installation will not work. Norm Grill's installation is a good example of an installation on a BMW. Also this copy of an e-mail message from DeVern Gerber is a good description for FI installations. Since the stock fuel tank is mounted low in the frame it has a fuel pump. This means that you're able to pull fuel up a slight incline. The nature of the installation takes advantage of gravity as much as possible so that the pump isn't over taxed. I'll run off the fuel cell until I feel the bike "starve". Then, by turning the A/B valve, I'll switch to the stock fuel tank. I'll then have about 150 miles of fuel left that is measured by the stock fuel gauge and easier to monitor without "guesstimations".
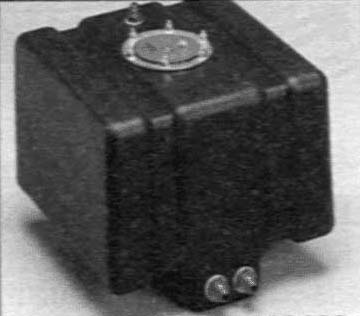
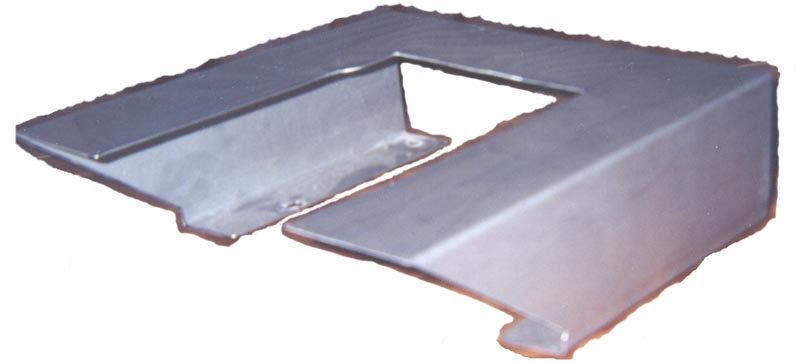
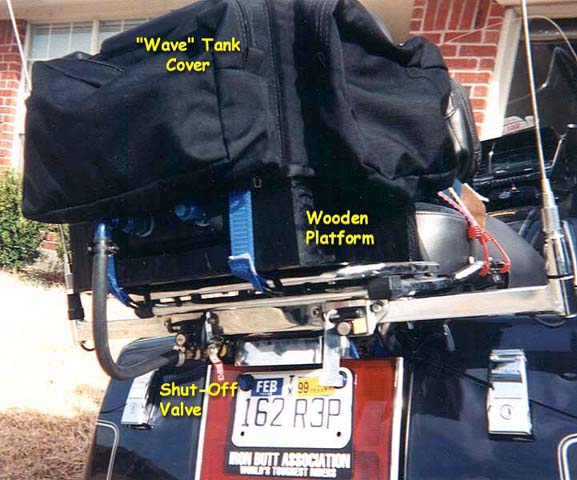
Project: A simple schematic can be viewed here. This was the concept I worked up before buying any components. It was my blueprint throughout the project. I started by fabricating a mounting platform out of ½" plywood and 2x4's. I did this for no other reason than because the material was at hand. This lets the fuel cell sit flat. There is a "sump" area on the bottom of the fuel cell that drops bellow the level of the bottom of the cell. This is where the feed tube connections are so that gas accumulates and you can make use of as much available gas as possible. I mounted the cell so the connectors face backwards. That way fuel is pushed toward the pick up lines under acceleration and the bike doesn't "starve" when taking off from a stop. A simple drawing of the platform is here. I painted it black for weather protection and because black is beautiful. I then went and had a platform made from sheet stainless. I worked up this design which the shop used to fabricate the new platform. It's lighter, stronger, and more weather proof that the original wooden one.
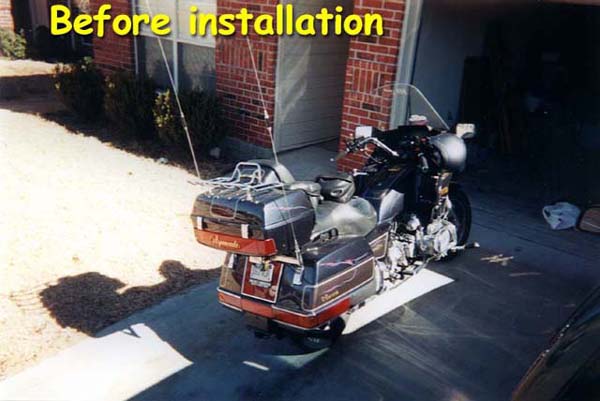
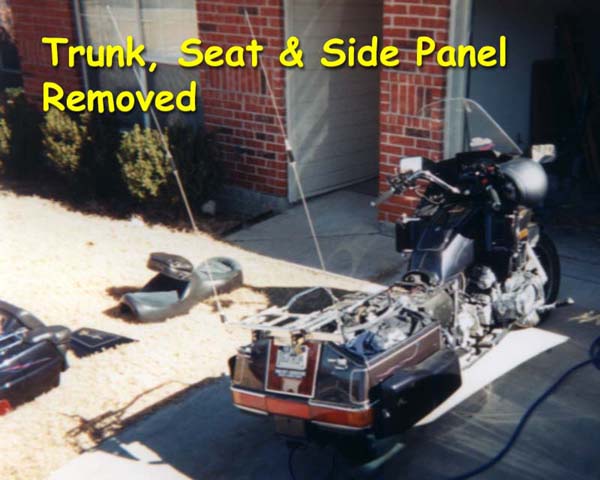
I removed the seat, the right sidecover, and the rear travel trunk. Here's what it looked like. The hose on the driveway is the compressor hose for the air ratchet. At first I considered mounting the cell in the passenger seat, but it's size would have forced me to remove the rider's back rest and the trunk would have been hard to open.. This way, I can load a duffel bag with personal junk and bungee it to the passenger seat if the saddle bags aren't enough. Ron makes a sloped fuel cell that straps down in the passenger seat of a Wing and still lets you access the trunk. Check it out if you're interested.
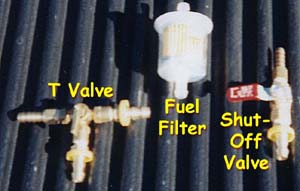
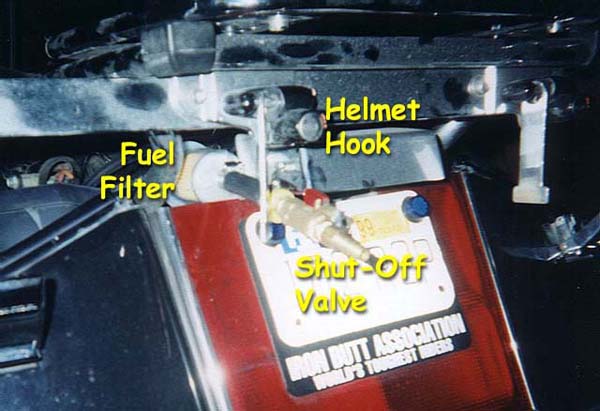
I pulled the 3/8" hose from below the travel trunk mounting bracket, along the left side of the frame (to clear the seat), crossed over wherever I could find clearance, came down behind the rear brake fluid filler and around the stock fuel tank. I came up from below the fuel pump and cut enough off to have plenty of slack. This routing allows for all side panels and the seat to be put back on to cover as much of the new fuel line as possible. Underneath the travel trunk bracket I installed a shut-off valve and a fuel filter (see photo above). The filter is required, but the shut-off valve is more for my piece of mind and over-engineering. The idea is that it will give me a way to shut off the fuel line when removing the fuel cell. I can shut off the valve, remove the last bit of fuel line between the valve and the cell, stick a 2" piece of fuel line with a cap (bolt?) stuck in it, remove the cell, and remount the travel trunk. This should be "doable" in about 30 minutes. That way, if I'm travelling with a big group of frequent-stoppers, I can put the trunk on to haul more junk (or win another show trophy). It also makes it easier to swap fuel filters if the aux tank has gas in it.
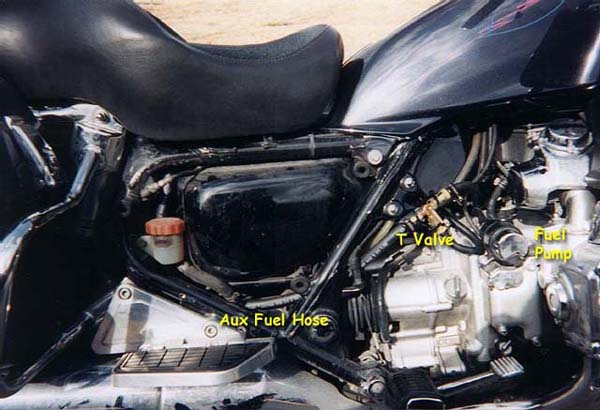
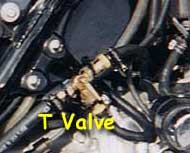
Where I come up from behind/underneath the stock fuel tank, I "T" into the stock fuel system with a brass A/B valve. The 3/8" fuel line ensures that there is plenty of fuel "on tap" whenever needed. The stock fuel lines were ¼" but once again I over-engineered the system intentionally.
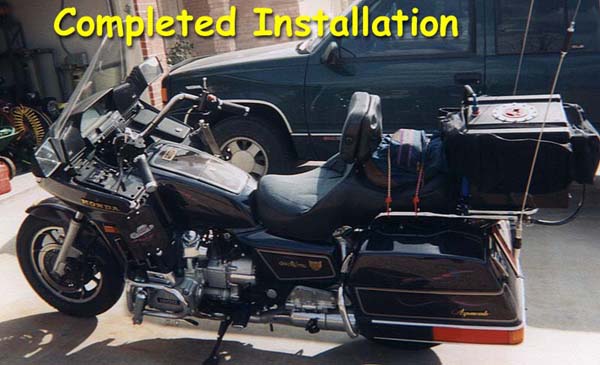
The fuel cell is strapped down to the travel trunk bracket via ratchet-type tie down straps. Since the IBA doesn't sanction bungie cords for this application, I thought it wise to follow their lead. Also, since the IB Rally doesn't allow for more than 11 gallons (total - float bowls and all), I followed their lead here too. Since many of the smaller rallies held each year follow IBA guidelines, it's always a good idea to check their specification before beginning these kinds of projects.
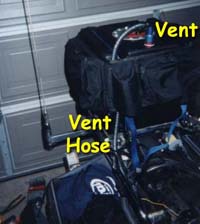
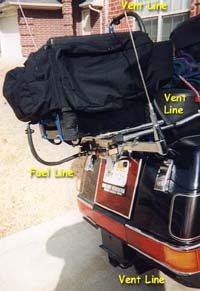
The vent (top) line was run down the side of the fuel cell, behind the seat and right saddle bag, and terminates on the outside of the Markland trailer hitch. That way fumes and "overflow" drain behind the bike and not on tires, plastic, or hot parts.
The "tank wrap" dresses up the installation a little and helps regain some of the storage space lost when I removed the travel trunk. It also retains and hides the vent hose. I ran the hose between the cell and the tank cover. You can't see it in any pictures, but I ran a ground wire from the travel trunk bracket and connected it to one of the bolts on the fuel cell filler neck. There is stenciling on the cell that instructs you to ground the neck. DO IT. It seems that a spark from accumulated static could ruin your day when it happens near 5 gallons of gasoline. Here's a parts list with source references. It's been some time since this parts list was created so contact information and pricing will need verifying. I used brass fittings for durability. I cut short runs of 3/8" fuel line and then split them. I used these pieces as backing to prevent the brass bits from scratching painted bike bits. Fuel lines, brass bits and such were secured using wire ties.
All material on this site (c) 1995 - Present, Mark Johnson. All rights reserved. |